Mastering the Art: How to Propagate Snake Plant Successfully
I’ve always loved how tough snake plants are. They look great and clean the air, which is a big plus. If you’re like me and want more of these awesome plants, or maybe you want to share some with friends, learning how to propagate snake plant is a fun project. I’m going to walk you through everything I’ve learned about making new snake plants, from picking the right method to keeping them happy as they grow. It’s not too hard, and I think you’ll enjoy it!
Key Takeaways
- To propagate snake plant, you can use leaf cuttings, divide the plant, or try water propagation.
- Always start with a healthy mother plant; this gives you the best chance for new growth.
- The best time to propagate snake plants is usually in spring or summer when they are actively growing.
- Use soil that drains well, and give your new plants good, indirect light to help them grow roots.
- Be patient! Propagating snake plants takes time, but with consistent care, your new plants will thrive.
Understanding Snake Plant Propagation
Why Propagate Snake Plants?
I’ve always loved snake plants, and propagating them is a great way to get more of these awesome plants without spending a ton of money. Plus, it’s super satisfying to watch a new plant grow from something you started! There are a few reasons why I find myself rooting snake plant cuttings so often:
- Expanding my collection: Obviously, more plants are always a good thing.
- Sharing with friends: Homemade gifts are the best, and a baby snake plant is a perfect present.
- Saving money: Buying new plants can get expensive, so propagation is a budget-friendly alternative.
Key Considerations Before Starting
Before I even think about grabbing my tools, I always take a moment to assess my snake plant. Not all leaves are created equal when it comes to propagation. Here’s what I consider:
- Health of the mother plant: A strong, healthy plant will give you the best chance of success.
- Variegation: Keep in mind that some varieties with yellow stripes might not propagate true to type from leaf cuttings. This is important to know if you want to maintain the exact look of your plant.
- Method selection: Different methods work better for different situations, so I think about which one suits my needs best. I’ll cover the different snake plant propagation methods later on.
It’s important to remember that patience is key. Propagating snake plants can take time, so don’t get discouraged if you don’t see results immediately. Just keep providing the right conditions, and eventually, you’ll have new little snake plants!
Benefits of Expanding Your Collection
Beyond just having more plants, expanding my snake plant collection through propagation has other perks. For one, snake plants are known for their air-purifying qualities, so more plants mean cleaner air! Plus, they’re incredibly low-maintenance, making them perfect for even the most forgetful plant owners. Here are some additional benefits of growing sansevieria from cuttings:
- Improved air quality: Snake plants help remove toxins from the air.
- Low maintenance: They’re drought-tolerant and don’t need a lot of attention.
- Aesthetic appeal: They add a touch of greenery to any space. I think this is the best way to propagate sansevieria.
Ultimately, learning how to make more snake plants is a rewarding experience that allows me to connect with nature and beautify my home.
Choosing the Right Propagation Method

Okay, so you’re ready to make more snake plants! Awesome. But before you grab your knife (or scissors!), It’s good to know your options. There are a few different ways to propagate snake plants, and each has its pros and cons. I’ll walk you through the most common methods so you can pick the one that’s best for you.
Leaf Cuttings: A Popular Choice
Leaf cuttings are probably the most well-known way to propagate snake plants. Basically, you chop up a leaf into sections and then get those sections to root. It’s a pretty straightforward process, but it can take a little longer than other methods. I’ve had decent success with this, but it requires some patience. Here’s what I’ve learned:
- You can root the cuttings in water or directly in soil. I’ve tried both, and honestly, I think water rooting is a bit easier to monitor. You can see the roots growing!
- Make sure you let the cut ends callous over for a day or two before planting or putting them in water. This helps prevent rot.
- Don’t get discouraged if it takes a while. Sometimes it can take weeks, even months, for roots to appear. Just keep the faith (and the water fresh!).
I remember one time, I had a bunch of leaf cuttings going, and I almost gave up on them because nothing seemed to be happening. Then, out of nowhere, tiny roots started popping up! It was so rewarding.
I’ve found that the success rate can vary quite a bit depending on the health of the leaf and the conditions you provide. I’m going to try leaf cutting in soil this time around.
Division: Separating for Success
Division is another great way to propagate snake plants, especially if you have a mature plant that’s getting a bit crowded. This method involves separating the plant into multiple smaller plants, each with its own set of roots. It’s generally faster than leaf cuttings because you’re starting with established roots. Here’s the gist:
- Carefully remove the snake plant from its pot.
- Gently tease apart the root ball, separating it into sections. Make sure each section has at least a few leaves and a good amount of roots.
- Pot each section in its pot with well-draining soil.
Division is my go-to when I want to quickly expand my collection. Plus, it’s a good way to rejuvenate an older plant. I find that the new divisions tend to grow more vigorously than the original plant did after being divided. It’s like giving them a fresh start!
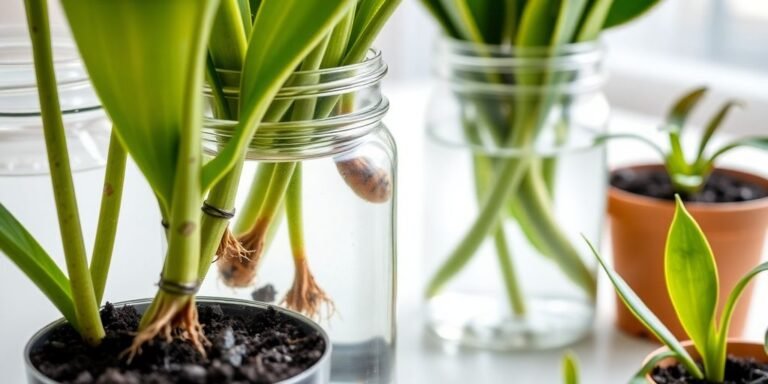
Water Propagation Techniques
Water propagation is a super simple method, and it’s great because you can watch the roots grow. All you need is a clean glass or jar, some water, and your snake plant cutting. Here’s how I usually do it:
- Take a healthy leaf cutting from your snake plant.
- Place the cutting in a glass of water, making sure that only the bottom inch or two is submerged. You don’t want the whole leaf to rot.
- Change the water every week or so to keep it fresh.
- Once the roots are an inch or two long, you can plant the cutting in soil.
I’ve had good luck with water propagation, but I’ve also noticed that sometimes the roots that grow in water can be a little weaker than those that grow in soil. So, when you do transplant to soil, be extra careful and keep the soil consistently moist for the first few weeks. I’m also going to try water propagation this time to compare the two methods.
Preparing for Successful Propagation

Before diving into propagating snake plants, I’ve learned that a little preparation goes a long way. It’s not just about sticking a leaf in water and hoping for the best. It’s about setting the stage for success. Here’s what I do to get ready:
Selecting Healthy Mother Plants
First things first, I always choose a healthy mother plant. This is probably the most important step. I look for a snake plant that’s vibrant, free from pests, and shows no signs of disease. Avoid plants with yellowing leaves, soft spots, or any other visible problems. A strong, healthy mother plant is more likely to produce strong, healthy cuttings. I want to make sure the mother plant is healthy before I even think about taking cuttings.
Essential Tools and Materials
Next, I gather all my tools and materials. Here’s my checklist:
- A sharp, clean knife or pair of scissors. I sterilize them with rubbing alcohol to prevent the spread of disease.
- Rooting hormone (optional, but I find it speeds up the process).
- Small pots or containers for the new cuttings.
- Well-draining potting mix (more on this later).
- Water.
- A spray bottle.
Having everything ready before I start makes the whole process smoother and less stressful. I also like to have a clean workspace to avoid contamination.
Optimal Timing for Propagation
Timing is also key. I’ve found that spring and early summer are the best times to propagate snake plants. This is when the plants are actively growing, and the cuttings are more likely to root successfully. I avoid propagating in the fall or winter when the plants are dormant.
I’ve had the best results when I propagate during the warmer months. The increased sunlight and warmer temperatures seem to give the cuttings a boost. Plus, I’m more likely to remember to water them when I’m already tending to my other plants.
Creating the Ideal Growing Environment
Best Soil Mix for Root Development
Okay, so you’ve got your snake plant cuttings ready to go. Now what? The soil is super important. I’ve learned that snake plants aren’t too picky, but they don’t like sitting in soggy soil. That’s a one-way ticket to root rot, and nobody wants that. I usually go for a well-draining mix. Think cactus or succulent soil – it’s light and airy, which is exactly what those little roots need to breathe. You can even make your own by mixing regular potting soil with some perlite and sand. I aim for about a 1:1:1 ratio. This ensures good drainage while still providing some nutrients.
Providing Adequate Lighting Conditions
Lighting is another biggie. Snake plants are pretty chill when it comes to light. They can handle low light, but they thrive in bright, indirect light. I’ve found that putting them near an east-facing window is perfect. They get some gentle morning sun, but nothing too harsh. Direct sunlight can scorch the leaves, so I always avoid that. If you only have a south-facing window, just make sure to put a sheer curtain up to filter the light. If your plants are looking pale or leggy, that’s a sign they need more light.
Maintaining Proper Moisture Levels
Watering is where a lot of people mess up, including me at times. Snake plants are drought-tolerant, which means they don’t need a ton of water. I usually wait until the soil is completely dry before watering again. When I do water, I soak the soil thoroughly and then let the excess drain out. I never let the pot sit in water, because, again, root rot is the enemy. In the winter, I water even less frequently because the plants aren’t actively growing. It’s all about finding that moisture balance.
I’ve found that underwatering is always better than overwatering with snake plants. They can bounce back from being a little dry, but once root rot sets in, it’s tough to save them. So, when in doubt, err on the side of caution and let the soil dry out completely between waterings.
Caring for Your Propagated Snake Plants
Watering Schedules for New Cuttings
Okay, so you’ve got your little snake plant cuttings happily potted (or still in water, no judgment!). Now comes the part where you don’t kill them with kindness – or rather, overwatering. Snake plants are succulents, and they don’t like soggy feet. I usually wait until the soil is almost completely dry before giving them a drink. When I do water, I make sure to soak the soil thoroughly, then let the excess drain away. During the winter months, I cut back on watering even more, since their growth slows down.
Monitoring Growth and Development
Watching your baby snake plants grow is super rewarding! I keep an eye out for new leaves emerging from the soil. That’s a sure sign that the roots are developing nicely. It’s also important to check the leaves themselves. Are they firm and upright? Or are they starting to look a little droopy or yellow? If they’re looking sad, it could be a sign of overwatering, underwatering, or not enough light. I also like to gently tug on the base of the plant every now and then. If it feels firmly rooted, that’s a great sign! If it comes right out of the soil, it probably hasn’t rooted yet, and I need to be extra careful with watering. Remember that bright light is essential for snake plants.
Troubleshooting Common Issues
Even with the best care, sometimes things go wrong. Here are a few common problems I’ve encountered and how I’ve dealt with them:
- Root Rot: This is usually caused by overwatering. If the base of the cutting is mushy and brown, it’s likely root rot. I carefully remove the affected parts and repot the cutting in fresh, dry succulent and cactus mix.
- Yellowing Leaves: This can be a sign of overwatering, underwatering, or not enough light. I adjust my watering schedule and move the plant to a brighter location.
- Stunted Growth: If the plant isn’t growing, it could be lacking nutrients. I sometimes add a diluted liquid fertilizer during the growing season.
One thing I’ve learned is that patience is key. Snake plants aren’t the fastest growers, so don’t get discouraged if you don’t see results right away. Just keep providing the right conditions, and they’ll eventually thrive. I always make sure I have the best time for propagating snake plants.
Transplanting and Long-Term Care

When to Move Cuttings to Soil
Okay, so you’ve patiently waited, and your snake plant cuttings have sprouted some roots – awesome! Now comes the big question: when do I move them into soil? I usually wait until I see a good network of roots, like at least an inch or two long, and maybe even a few tiny pups (baby plants) starting to form. This usually takes a month or more, so patience is key. Don’t rush it! If you’re using water propagation, letting the roots get a little established in water first seems to give them a better start when they finally hit the soil.
Choosing the Right Pot and Drainage
When it’s time to pot up your little snake plant babies, think small. Don’t go for a huge pot right away; it’s better to start with something appropriately sized for the root ball. A pot that’s too big can hold too much moisture, which can lead to root rot, and nobody wants that! I always make sure the pot has excellent drainage. Snake plants hate sitting in soggy soil. I usually use terracotta pots because they’re breathable and help the soil dry out evenly. You can also add some rocks or gravel at the bottom of the pot to improve drainage even further.
Ongoing Care for Thriving Plants
Once your snake plant is happily settled in its new pot, it’s time to think about long-term care. Here’s what I do:
- Watering: I let the soil dry out completely between waterings. Seriously, completely. Then, I give it a good soak. Overwatering is the number one killer of snake plants, so err on the side of caution.
- Lighting: Snake plants are pretty adaptable, but they do best in bright, indirect light. Avoid direct sunlight, which can scorch the leaves. A spot near an east- or west-facing window is usually perfect.
- Fertilizing: I only fertilize my snake plants a couple of times a year, during the growing season (spring and summer). I use a balanced liquid fertilizer diluted to half strength.
- Repotting: Snake plants don’t need to be repotted very often. I usually only repot mine every two or three years, when they’ve outgrown their pots.
Remember, snake plants are pretty low-maintenance, so don’t overthink it. Just give them the right conditions, and they’ll thrive. If you notice any problems, like yellowing leaves or mushy roots, adjust your care accordingly. With a little bit of attention, you can enjoy your propagated snake plants for years to come!
Wrapping Things Up
So, there you have it. I’ve walked you through how I get more snake plants from the ones I already have. It’s not that hard, just takes a little bit of waiting. I mean, who doesn’t love having more plants around? They make my place feel so much nicer, and honestly, it’s pretty cool to see a new plant grow from just a piece of another one. If I can do it, you definitely can too. Give it a shot, you might surprise yourself!
Frequently Asked Questions
When is the best time to propagate snake plants?
I’ve learned that the best time to start new snake plants is during spring. This is when they’re actively growing, which means they’ll have a better chance of developing strong roots. You can also try in summer or fall, but I always avoid winter because the plants are resting then.
What kind of soil should I use for propagating snake plants?
When it comes to putting your snake plant cuttings in soil, I’ve found that a well-draining mix is key. I usually go for an organic succulent and cactus mix, or just a good potting soil. This helps prevent the roots from getting too wet and rotting, which is super important for these plants.
What are the ideal lighting conditions for newly propagated snake plants?
I’ve noticed that snake plants, even new cuttings, really like bright light. But, I make sure it’s indirect light, not direct sun, because too much direct sun can burn their leaves. Finding that sweet spot with good, indirect light helps them grow best.
How often should I water my snake plant cuttings?
I always make sure not to overwater my snake plant cuttings. They prefer the soil to be just a little bit damp, not soaking wet. I let the soil dry out a bit between waterings to avoid root rot, which is a common problem if they get too much water.
How long does it take for snake plant cuttings to root?
I’ve found that patience is a virtue when propagating snake plants, especially with leaf cuttings. It can take a few months before you start seeing roots form. Don’t worry if it seems slow; that’s just how they are!
Can I propagate snake plants in water?
Yes, I’ve found that you can propagate snake plants in water. I just place the cut end of a healthy leaf into water, and eventually, roots will start to grow. Once the roots are a good size, I transfer them to soil.


Pingback: Mastering the Art: How to Plant Ficus Pumila for Lush Growth 101