A Step-by-Step Guide: How to Plant Persimmon Seeds for a Bountiful Harvest
So, you want to grow your persimmon trees from scratch? That’s awesome! It might seem a bit tricky at first, but honestly, it’s doable. This guide is all about showing you how to plant persimmon seeds, step-by-step, so you can end up with a bunch of tasty fruit. We’ll cover everything from picking the right seeds to getting your little seedlings ready for their big move outside. It’s a fun journey, and with a little patience, you’ll be enjoying your homegrown persimmons before you know it.
Key Takeaways
- Always start with good, healthy seeds from ripe persimmons. Cleaning them well is super important.
- Persimmon seeds need a cold period, called stratification, to wake them up and get them ready to sprout. Don’t skip this step!
- When planting, make sure the soil is loose and drains well. Young seedlings don’t like sitting in soggy dirt.
- Once your seedlings are growing, they’ll need consistent care, like regular watering and some protection from bugs.
- Picking the right spot and transplanting carefully are key for your persimmon tree to really take off and grow strong.
Seed Selection and Preparation
Okay, so you want to grow persimmons from seed? The first step is getting your hands on some good seeds. It’s not as simple as just grabbing any old seed you find. You need to be a little picky to increase your chances of success. Let’s break it down.
Harvesting Persimmon Seeds
To get viable seeds, you need to start with ripe persimmons. Look for fruits that are plump, firm, and have a good color for the variety you’re after. Avoid the mushy ones or those with signs of rot – those seeds probably aren’t going to do you any favors. Carefully cut the fruit open to get to the seeds inside. They’re usually embedded in the pulp, so you’ll need to dig around a bit.
Cleaning and Preparing the Seeds
Once you’ve got your seeds, it’s time to clean them up. Get a bowl of cool water and wash the seeds thoroughly to remove any pulp or debris. You can use a soft brush to gently scrub them if needed. After washing, spread the seeds out on a paper towel or in a well-ventilated area to dry. Make sure they’re completely dry before you store them. You don’t want any mold growing on your precious seeds!
It’s important to remove any visibly damaged or discolored seeds at this stage. These are less likely to germinate, so you’re better off tossing them out. Only keep the healthy-looking seeds for planting.
Tools and Materials for Seed Preparation
Here’s a quick list of what you’ll need for seed selection and preparation:
- Ripe persimmons
- Sharp knife or fruit-cutting tool
- Soft-bristled brush
- Cool running water
- Paper towels
- A container for storing the seeds
| Tool/Material | Purpose |
|---|---|
| Ripe Persimmons | Source of the seeds |
| Knife/Cutting Tool | To open the fruit |
| Soft-Bristled Brush | To clean the seeds |
| Cool Running Water | To wash away pulp and debris |
| Paper Towels | To dry the seeds |
| Storage Container | To store the seeds after drying site preparation |
Seed Germination and Growth

Okay, so you’ve got your persimmon seeds prepped and ready to go. Now comes the fun part: getting them to grow! This stage is all about creating the right environment and understanding what your little seeds need to sprout and thrive. It’s not rocket science, but a little attention to detail goes a long way.
Optimal Germination Conditions
Think of your persimmon seeds as Goldilocks – they need things to be just right. Temperature is key; aim for somewhere between 65-75°F (18-24°C). Too cold, and they’ll just sit there. Too hot, and you risk cooking them. Moisture is also super important. You want the soil to be consistently damp, but not waterlogged. Imagine a wrung-out sponge. Light isn’t a huge deal at this stage, but once they sprout, they’ll need some indirect sunlight. Direct sunlight can be too harsh for the little guys.
Importance of Seed Stratification
Okay, so stratification sounds fancy, but it’s just mimicking winter. Persimmon seeds naturally go through a cold period before they’re ready to sprout. This process breaks their dormancy and tells them it’s time to wake up and grow. You can do this by:
- Place the seeds in a damp paper towel or some peat moss.
- Putting them in a sealed plastic bag.
- Sticking them in the fridge (not the freezer!) for 6-8 weeks.
It might seem like a pain, but trust me, it significantly increases your germination rate. Think of it as giving your seeds a head start. This is important for organically growing persimmon trees.
Stratification is a game-changer. Without it, your seeds might just sit there and do nothing. It’s like they’re waiting for the signal that spring has arrived. Don’t skip this step!
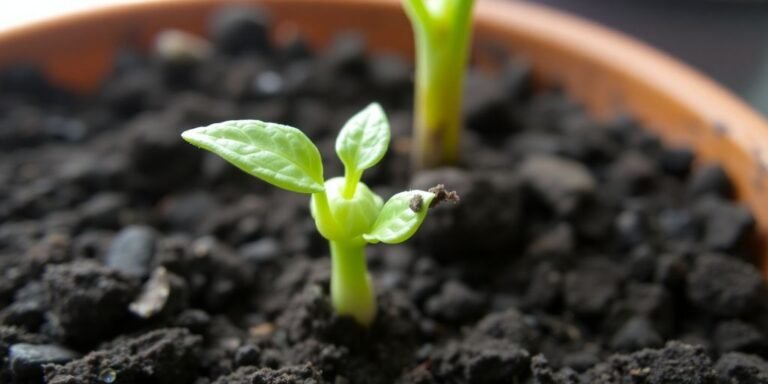
Progress Stages of Persimmon Seedlings
Watching your seeds sprout is exciting! Here’s a rough timeline of what to expect:
| Stage | Length | Characteristics | Management Practices |
|---|---|---|---|
| Seed Imbibition | 1-3 days | The seed absorbs water, swells, and the seed coat might soften. | Keep consistent moisture, avoid overwatering. |
| Radicle Emergence | 3-7 days | The radicle (embryonic root) emerges. | Monitor moisture, ensure consistent hydration. |
| Hypocotyl | 7-14 days | The stem pushes the seed leaves above the soil. | Keep consistent moisture and temperature, and avoid direct sun. |
| Seedling Growth | 14+ days | Seedling establishes, growing leaves and roots. | Gradually increase light exposure, and provide support if needed. |
Understanding these stages helps you troubleshoot any problems that might arise. If a seed isn’t swelling, it might not be viable. If the seedling is leggy, it needs more light. Pay attention, and you’ll be rewarded with healthy, growing persimmon trees!
Planting and Initial Care
Soil Preparation for Persimmon Seeds
Getting the soil right is super important for your persimmon seeds. You want to make sure they have the best possible start. A well-draining soil is key, and it should be rich in organic matter. Think about it like building a house; the soil is the foundation.
Here’s what to keep in mind:
- Texture matters: Loamy soil, which is a mix of sand, silt, and clay, is usually the best. It balances drainage and aeration. If you have clay soil, you might need to add stuff to help with drainage. Sandy soil might need organic matter to hold onto nutrients.
- Organic matter is your friend: Compost or well-rotted manure can improve soil structure, aeration, and water retention. It also adds nutrients.
- pH is important: Persimmons like slightly acidic to neutral soil (pH 6.0-7.0). You can test your soil and adjust it if needed. This helps prevent nutrient problems.
Good soil prep is like setting the table for a feast. It ensures your persimmon seedlings have everything they need to thrive right from the start.
Planting Depth and Spacing
How deep you plant the seeds and how far apart you space them make a big difference. It affects root growth and how the tree will grow later on. Getting this right from the start sets the stage for healthy growth. You can learn how to grow persimmon seeds with the right planting depth and spacing.
- Planting depth: Aim for about 1-2 inches deep. You want the seed just under the surface. This keeps it moist and warm enough to germinate, but not so deep that it dries out.
- Spacing: Give your seedlings enough room to grow. They need space for their roots and branches. About 6-8 feet between seedlings is a good starting point.
Watering and Fertilizing Young Seedlings
Consistent watering and the right fertilizer are essential for healthy growth. These things make sure your seedlings get the water and nutrients they need.
- Watering: Water regularly, especially when it’s dry. Deep watering, where the water reaches the roots, is better than watering a little bit all the time.
- Fertilizing: Be careful with fertilizer. Use a balanced fertilizer made for fruit trees, and follow the instructions. Too much fertilizer can hurt the seedlings. You can find fruit tree fertilizers at most garden stores.
| Stage | Frequency | Notes, and it’s important to get it right. Proper soil preparation is key to healthy seedling growth.
Ongoing Cultivation and Maintenance
Pruning for Healthy Growth
Okay, so you’ve got your persimmon tree growing, which is awesome! But don’t think the work is over. Pruning is super important. It helps shape the tree, encourages fruit production, and gets rid of any dead or diseased branches. I usually prune in late winter or early spring, before new growth starts. You want to aim for an open canopy so sunlight can reach all parts of the tree. It might seem scary to cut off branches, but trust me, it’s for the best in the long run.
Pest and Disease Protection
Ugh, pests and diseases. Every gardener’s nightmare, right? Persimmon trees can be susceptible to a few things, like persimmon psyllid or leaf spot. Keep an eye out for any weird spots, discoloration, or infestations.
Here’s a quick rundown of common issues:
- Leaf Spot: Watch for dark spots on leaves. Remove fallen leaves to prevent it from spreading.
- Root Rot: This is usually from overwatering. Make sure your soil drains well.
- Anthracnose: This affects both fruit and leaves. Copper-based fungicides can help.
Prevention is key. Regularly inspect your trees, keep the area around them clean, and consider using organic pest control methods if needed. A healthy tree is less likely to get attacked in the first place.
Optimal Growing Conditions for Persimmon Trees
Persimmon trees are pretty adaptable, but they definitely have preferences. They love full sun, at least 6-8 hours a day. Soil-wise, well-draining soil is a must. They can tolerate different soil types, but heavy clay can be a problem if it stays too wet.
Here’s a simple table for quick reference:
| Factor | Ideal Condition |
|---|---|
| Sunlight | 6-8 hours daily |
| Soil | Well-draining, slightly acidic to neutral (pH 6.0-7.0) |
| Watering | Regular, especially during dry periods |
| Fertilizing | Balanced fertilizer in spring |
| Winter Hardiness | Varies by variety; check your specific tree |
Also, keep an eye on watering, especially during dry spells. Young trees need consistent moisture, but even established trees will appreciate a good soak when it’s hot and dry. A balanced fertilizer in the spring can also give them a boost. Just don’t overdo it – too much fertilizer can do more harm than good.
Transplanting and Establishing Your Tree

Choosing the Right Location
Okay, so you’ve nurtured your persimmon seedlings, and they’re ready for the big leagues. The first thing you need to think about is location, location, location! Persimmons are sun-loving trees, so you’ll want to pick a spot that gets at least 6-8 hours of direct sunlight each day. Also, consider the mature size of the tree. Some varieties can get pretty big, so make sure they have enough room to spread out without crowding other plants or structures. Good air circulation is also important to help prevent fungal diseases. You don’t want a spot that’s constantly damp or enclosed. Think open and sunny!
Here’s a quick checklist:
- Sunlight: Minimum 6-8 hours of direct sunlight daily.
- Space: Adequate room for mature tree size (check variety details).
- Air Circulation: Good airflow to prevent fungal issues.
- Soil Drainage: Well-draining soil is a must.
It’s better to over-prepare the location than to have to move a mature tree later. Trust me, your back will thank you.
Step-by-Step Transplanting Process
Alright, let’s get down to business. Transplanting can be a little stressful for the tree, so you want to be as gentle as possible. First, dig a hole that’s twice as wide as the root ball and just as deep. This gives the roots plenty of room to spread out. Gently remove the seedling from its container, being careful not to damage the roots. If the roots are circling the pot, gently tease them apart. Place the tree in the hole, making sure the top of the root ball is level with the ground. Backfill the hole with soil, gently firming it around the roots. Water thoroughly to help settle the soil and eliminate air pockets. A little healthy rootstock can help the tree get established.
Here’s a simple breakdown:
- Dig a hole: Twice as wide as the root ball, same depth.
- Remove seedling: Gently, without damaging roots.
- Place in hole: Top of root ball level with ground.
- Backfill: Firmly, water thoroughly.
Post-Transplant Care for Success
So, you’ve got your persimmon tree in the ground. Now what? Well, the first few weeks are crucial. Water regularly, especially if the weather is dry. You want to keep the soil consistently moist, but not soggy. A layer of mulch around the base of the tree can help retain moisture and suppress weeds. Avoid fertilizing right away; give the tree a few weeks to adjust before adding any nutrients. Keep an eye out for pests or diseases, and address them promptly if they appear. With a little TLC, your persimmon tree will be off to a great start! Consistent watering is key during this period.
Here’s a simple table for the first few weeks:
| Task | Frequency | Notes |
|---|---|---|
| Watering | 2-3x/week | Keep soil moist, not soggy |
| Mulching | Once | Around the base, avoid touching the trunk |
| Pest Control | As needed | Check regularly |
| Fertilization | After 4 weeks | Light application only |
Wrapping Things Up
So, there you have it! Growing persimmons from seeds might seem like a lot of steps, but it’s totally doable. You’ve got the lowdown on picking the right seeds, getting them ready, and then planting them just right. Remember, gardening takes some patience, and persimmons are no different. Just keep an eye on your little trees, give them what they need, and before you know it, you’ll be enjoying your very own homegrown persimmons. It’s a pretty cool feeling, trust me.
Frequently Asked Questions
When is the best time to collect persimmon seeds?
The best time to gather persimmon seeds is usually when the fruit is fully ripe and soft. This means the seeds inside are mature and ready for planting. Look for fruit that has fallen naturally or is easily picked from the tree.
How long does it typically take for persimmon seeds to germinate?
It can take a little while for persimmon seeds to sprout, typically anywhere from a few weeks to several months. This is because they often need a cold period (stratification) to help them wake up. Be patient!
What kind of soil is best for persimmon seedlings?
Persimmon seedlings like soil that drains well and has lots of good stuff in it, like compost. A mix of sand, silt, and clay (loamy soil) is usually perfect. Avoid heavy clay soils that hold too much water, as this can hurt the roots.
What are some common pests and diseases that affect persimmon seedlings?
Common problems include aphids, which are tiny bugs that suck plant juices, and fungal diseases like powdery mildew, which looks like white powder on leaves. Keeping your plants healthy and checking them often can help prevent these issues.
Can I grow persimmon trees in containers?
Yes, you can grow persimmon trees in pots, especially when they are young. Make sure the pot is big enough for the roots to grow and has drainage holes. As the tree gets bigger, you’ll need to move it to a larger pot or plant it in the ground.
How long until a persimmon tree grown from seed produces fruit?
Persimmon trees usually start making fruit when they are about 3 to 6 years old, but this can depend on the type of persimmon and how well it’s cared for. Some might take a bit longer.

